Bulk Actions
Process multiple returns efficiently with bulk assignment, exports and transfer tools in ReturnMate.
ReturnMate keeps decision-heavy steps — approvals, inspections and refunds — on the individual RMA, and provides purpose-built bulk tools for the high-volume, low-risk parts of the job: assigning work, exporting data, checking parcels in and moving stock between stores.
Bulk Assign RMAs
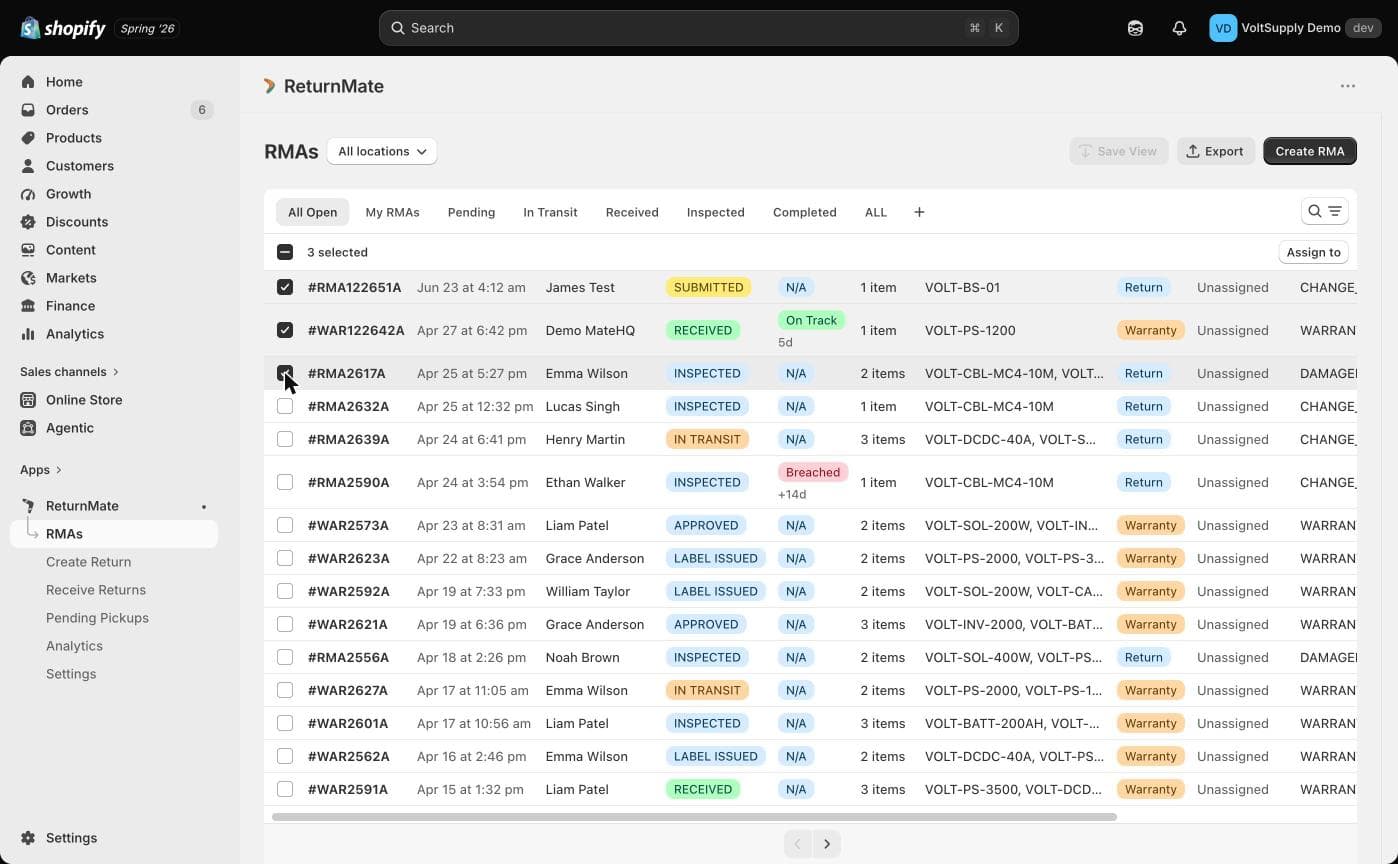
Distribute work across your team directly from the RMA list:
Filter the list
Open the RMAs page and use the tabs (All Open, My RMAs, Pending, In Transit, Received, Inspected, Completed) and filters to narrow down the RMAs you want to hand out.
Select RMAs
Tick the checkbox on each row, or use the header checkbox to select everything on the page.
Choose Assign to
With rows selected, click the Assign to bulk action. A modal titled Assign N RMAs opens (or Assign all filtered RMAs if you selected everything matching the current filters).
Pick a user and confirm
Select the team member from the Assign to dropdown and click Assign. Every selected RMA is assigned to that person and appears in their My RMAs tab.
SLA at-risk and breach emails go to the assigned team member, so bulk assignment is the fastest way to make sure nothing sits unowned. See SLA & Timelines.
Export to CSV
The Export button at the top of the RMA list downloads a CSV of the rows currently shown, respecting your active tab, filters and search:
| Column | Contents |
|---|---|
| RMA # | The RMA number |
| Type | Return or Warranty |
| Order # | The linked Shopify order |
| Customer / Email | Customer name and email |
| Status | Current RMA status |
| SLA Status | On Track, At Risk, Breached, Paused, Completed or N/A |
| Items | Number of items on the RMA |
| Created / Updated | ISO timestamps |
The export covers the current page of results (up to 50 rows). For larger extracts, page through the list or narrow your filters, then export each page.
Rapid Check-in on the Receive Returns Page
For processing a day's deliveries, the Receive Returns page (in the app navigation) is the fastest tool: scan the courier barcode or type the tracking or RMA number, press Enter, and the RMA is marked as received — then scan the next parcel. Inter-store transfers are detected and received automatically in the same flow.
See Receiving Returns for the full walkthrough, including the Awaiting Check-in and Recently Received queues.
Bulk Transfer Operations
If you run multiple stores or locations, the Transfers page (shown in the navigation when multi-store is enabled) includes bulk tools on both sides of a transfer.
Bulk receiving incoming transfers
On the Incoming → In Transit tab:
- Select individual transfers and click Receive Selected (N) to receive them all at once.
- Transfers that shipped together on one consignment are grouped as a pallet — click Receive All on the pallet group to check in every item on it in a single action.
Each transfer is processed individually behind the scenes, so if one fails you'll see a count of received versus failed items rather than losing the whole batch.
Bulk label generation for outgoing transfers
On the Outgoing → Pending tab, select the transfers to dispatch (or use Select All Pending), then choose:
| Action | What it does |
|---|---|
| Print Individual Labels | Generates one label per selected transfer |
| Print Pallet Label (TNT) | Generates a single TNT consignment covering all selected transfers, using their combined weight — ideal for palletised runs between stores |
| Mark Dispatched (Manual) | Records the transfers as dispatched without generating labels, for items moved by van run or other manual means |
Saved Views
If you run the same filter combination regularly (for example, "Received warranty RMAs at the main warehouse"), save it:
- Apply your filters on the RMA list
- Click Save View
- Name the view and click Save view
The saved view appears as an extra tab on the RMA list. See RMA Queues & Views.
What Isn't Bulk — By Design
Approving, rejecting, inspecting and refunding are per-RMA actions. Each involves a judgement call (who pays shipping, item condition, refund amount), so ReturnMate keeps them on the RMA detail page rather than offering one-click mass processing. To move through a queue quickly, filter the list to the relevant tab and work top to bottom — see Approvals, Labels & Tracking.
Best Practices
- Filter before you select — bulk-assign from a tightly filtered list
- Save views for the filter combinations you use daily
- Use the Receive Returns page for the day's deliveries instead of opening each RMA
- Use pallet mode for regular inter-store consignments
- Export the filtered list for reconciliation and reporting