The Customer Portal: What Your Customers See
A merchant's walkthrough of the customer returns portal — login, the return wizard, shipping choices, quotes and messaging.
This guide walks through the portal exactly as your customers experience it, and shows which of your settings change each step. Use it to train support staff and to answer "what is my customer seeing right now?"
Portal entry
Customers reach the portal from the link you publish (order confirmation emails, your returns page, or Shopify's order status page). The portal runs on ReturnMate's domain or on your own custom domain if configured in Settings → Domain Settings. Branding — logo, colours, fonts and every heading and button label — comes from Settings → Branding.
Step 1: Sign in with email verification
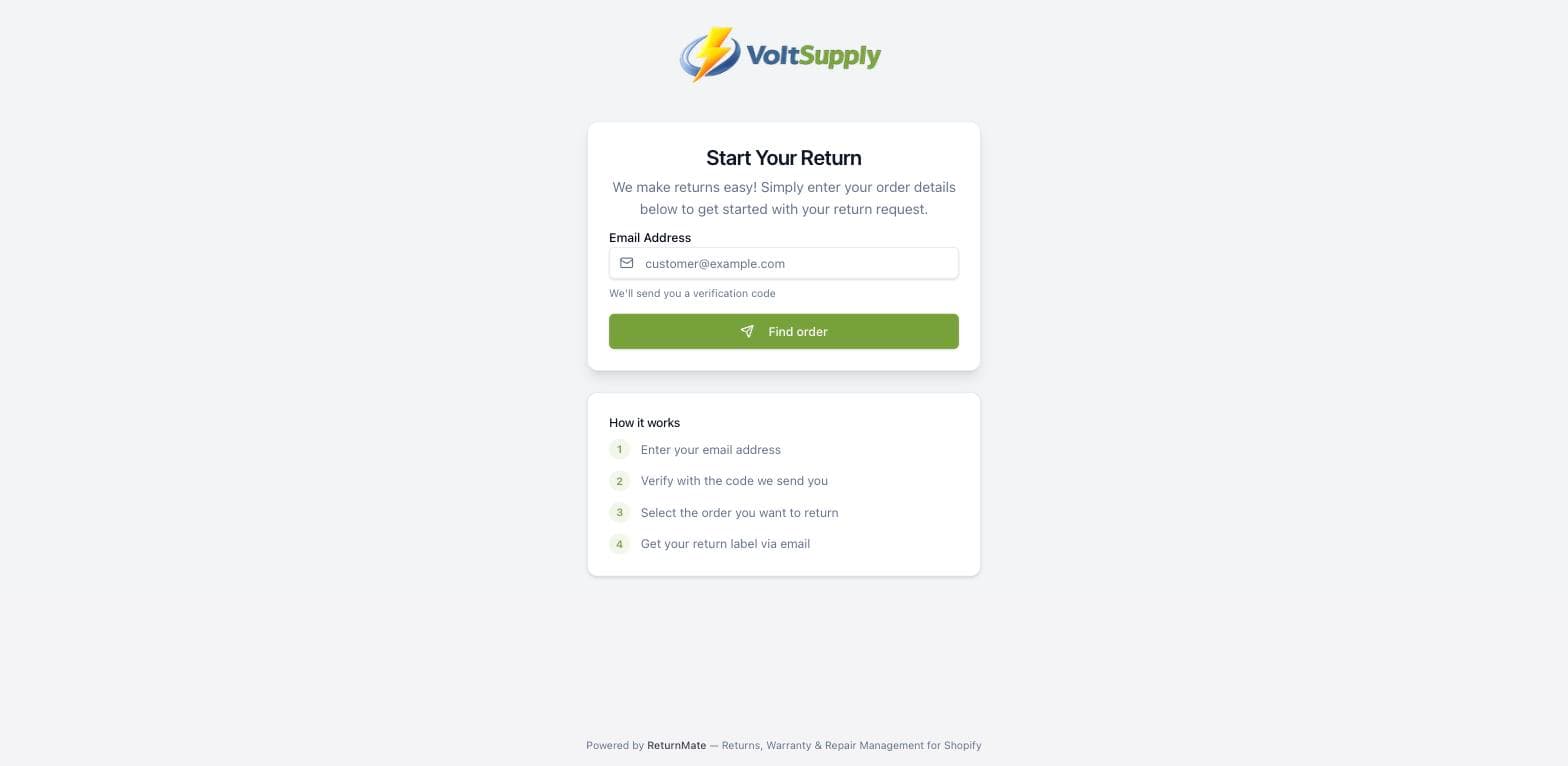
The customer enters the email address they used on the order and clicks Find order. ReturnMate emails a 6-digit verification code; entering it (Verify & Continue) starts a session for that store and email. A Resend Code option is available, and code requests are rate-limited to prevent abuse.
Customers arriving from a ReturnMate email use a magic link that signs them in directly.
The portal matches on email only. If a customer "has no orders", the most common cause is that they're entering a different email address from the one on the Shopify order.
Step 2: Choose the order and items
Eligible orders are listed with their line items. The customer ticks items and sets quantities, then continues. They'll see:
- "Return in progress" if the order already has an open RMA (re-submission is allowed only after a rejection or cancellation)
- An empty state — "We couldn't find any eligible orders for this email address. Orders may be outside the return window or already returned."
- A "Purchased elsewhere? Submit a third party warranty repair" link, only if you've enabled Third Party Repairs (see Third-Party Repair Settings)
Step 3: Pick a return reason
The reasons offered are your configured return reasons (Settings → Return Reasons), filtered intelligently:
- Warranty reasons only appear while the product is inside its warranty period; "out of warranty" reasons only appear once it's outside (based on your Warranty Settings).
- Change-of-mind reasons are disabled once the return window expires (your shop-wide window, default 30 days, or a per-reason override). The customer sees "Return window expired" and a note that warranty and faulty returns may still be available. In the final week they see a "days remaining" warning.
Steps 4–8: The dynamic wizard
The remaining steps appear only when the reason or your settings require them:
- Confirm Address — always shown; address autocomplete is powered by Google Places with a manual-entry fallback.
- Serial Numbers — shown when serial capture is enabled for the portal and the item requires it (Serial Tracking Settings). Can be optional or required.
- Packaging — for change-of-mind reasons that require original box and accessories.
- Upload Photos — shown when the reason requires photos, and always for damaged-in-transit and wrong-item returns. Accepts JPEG, PNG, MP4 and MOV up to 50MB per file, up to 10 files. At least one photo/video is required when this step appears.
- Additional Details — a description of the issue, minimum 40 characters, when the reason requires it.
- Review & Submit — change-of-mind returns show a cost summary (item value, minus any restocking fee and return shipping); other returns show a simple confirmation. On submit the customer sees "Return submitted!" and is taken to their status page.
The wizard does not ask the customer to choose refund vs repair vs replacement — resolution is determined by your reason configuration and your team's decision during processing.
Step 9: Return method (after approval)
Once you approve the RMA (or immediately, for auto-approved reasons), the customer chooses how to send the item back. Only the methods you allow in Settings → Return Locations & Methods appear:
- Retail drop-off — free; drops at one of your listed locations
- Own courier — customer arranges shipping at their cost, then uploads the carrier and tracking number (they're reminded to write the RMA number on the package)
- Ship with your suggested carrier — a prepaid label; if the return is customer-paid, they must tick "I agree to pay the return shipping fee of $X which will be deducted from my refund amount."
- Depot drop-off — available for TNT and Team Global Express; the customer drops at a carrier depot
Warranty, damaged-in-transit and wrong-item returns are always free for the customer.
Pickup booking
For TNT and TGE, customers can book a pickup at their address: TNT offers live availability windows; TGE offers morning (8am–12pm) or afternoon (12pm–5pm). The confirmation tells them the driver brings the label — nothing to print.
Labels and dangerous goods
Prepaid labels arrive by email and are downloadable from the status page. For DG items the portal also provides the DG Declaration with a warning that both documents must be printed or the courier will refuse pickup.
The status page
The customer's status page shows a progress bar (five stages for warranty/repair, four otherwise), tracking history with carrier deep-links, and:
- Two-way messaging — customers can reply to your customer-visible notes; messages appear on the RMA timeline for your team (Diagnostics & Notes)
- Quotes — when you send a repair, replacement, return-shipping or upgrade quote, the customer sees the amount, any inspection notes and photos, and the expiry date. Accept & Pay redirects to a Shopify invoice for payment; Decline Quote offers three choices: Ship my item back to me (they pay return shipping), Collect from store (free), or Dispose of my item (free). See Repair Quotes.
- Customer pickup — when an item is ready for in-store collection, the page shows pickup details (Customer Pickup)
- A credit summary (item value − restocking fee − return shipping) for standard returns
Common customer issues
| What the customer reports | Likely cause | Fix |
|---|---|---|
| "No orders found" | Different email than the order | Check the order's email in Shopify; staff can create the RMA instead (Staff-Created Returns) |
| "It says my return window expired" | Change-of-mind window passed | Warranty/faulty reasons may still apply; staff can override by creating the RMA |
| "I can't upload my photo" | File over 50MB or unsupported type | Ask for JPEG/PNG photos or MP4/MOV video under 50MB |
| "I didn't get the code" | Spam filtering or typo | Resend Code; verify the email address |
Merchant settings that shape this experience
- Branding, copy and custom domain — Domain & Branding
- Return reasons and their required steps — Settings → Return Reasons
- Return window — shop default and per-reason overrides
- Return methods and drop-off locations — Return Locations & Methods
- Serial capture — Serial Tracking Settings
- Restocking fees — Restocking Fees
- Third party repairs toggle — Third-Party Repair Settings